Primrose Flower Tutorial
Hello and welcome to a long overdue flower tutorial.
I am a real sucker for flower arranging magazines and flower and seed catalogues as I just love looking at how flowers are constructed and whether I can recreate the design and colouring in paper.
Some primroses on the front of a magazine really caught my eye recently as they were so delicate and the colouring so bright. So out came the dies and inks !

Primroses are quite simple structures but are made up of five petals which appear to have a notch in the top of the rounded petal. Over the years I have purchased a large selection of very different petal dies and so I was able to have a good hunt through and found this perfect one from a set by Donna Salazar (sadly no longer available).

I have used my usual go to cardstock (Stampin Up Very Vanilla) and Fossilised Amber Distress Ink. As you can see I have only splodged the ink over the central area with a paintbrush. Nothing technical!

Each petal was spritzed with water and scrunched up - I use the wooden end of an old paintbrush to get this started and then give everything a final twist. Leave to dry naturally rather than blasting with a heat gun. If I am in a hurry I sit them on the radiator, otherwise I normally leave them overnight.

When dry you can carefully pull out the individual petals.

Using a bone folder (or a wooden one as I have) pull out each of the leaves from the centre to the outside but keep in as many of the creases as you can.

Using a ball tool smooth out the centre of the flower on the soft mat.

Turn the flower over and using a smaller ball tool run this around the very outside edge of each petal.

When you then turn the flower over it just needs a little "squish" together and the addition of a yellow or green sticky dot in the centre.

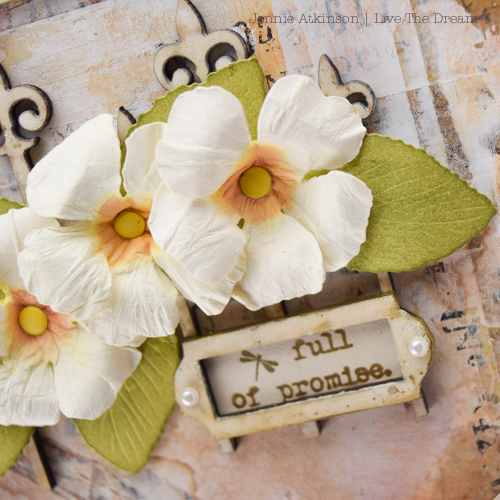
Getting the right leaf shape and colour is also important and whilst this leaf shape is not quite right it is almost there (from Tammy Tutterow's Pom Pom Posies). I have blended Peeled Paint and Forest Moss Distress Ink and curled the leaves around a bone folder.
Not a true primrose but they certainly look very bright and delicate and full of spring promise on my project which I shared at Calico Craft Parts earlier today.


I am a real sucker for flower arranging magazines and flower and seed catalogues as I just love looking at how flowers are constructed and whether I can recreate the design and colouring in paper.
Some primroses on the front of a magazine really caught my eye recently as they were so delicate and the colouring so bright. So out came the dies and inks !
I have used my usual go to cardstock (Stampin Up Very Vanilla) and Fossilised Amber Distress Ink. As you can see I have only splodged the ink over the central area with a paintbrush. Nothing technical!
Each petal was spritzed with water and scrunched up - I use the wooden end of an old paintbrush to get this started and then give everything a final twist. Leave to dry naturally rather than blasting with a heat gun. If I am in a hurry I sit them on the radiator, otherwise I normally leave them overnight.
When dry you can carefully pull out the individual petals.
Using a bone folder (or a wooden one as I have) pull out each of the leaves from the centre to the outside but keep in as many of the creases as you can.
Using a ball tool smooth out the centre of the flower on the soft mat.
Turn the flower over and using a smaller ball tool run this around the very outside edge of each petal.
When you then turn the flower over it just needs a little "squish" together and the addition of a yellow or green sticky dot in the centre.
Not a true primrose but they certainly look very bright and delicate and full of spring promise on my project which I shared at Calico Craft Parts earlier today.
I hope this inspires you to have a go at making some spring primroses.
If you would like to know how I created the background then please click the link HERE.
As always thank you for joining me.
Jennie x
Comments
Alison x