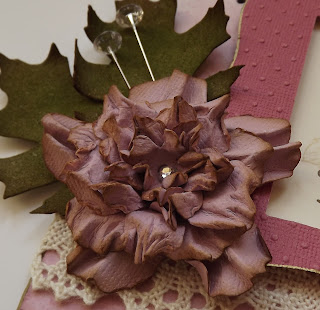
Dahlia Style Flower
 I have been making flowers for my scrapbooking and mini-books for some time now. Making your own flowers is very satisfying, economical, but most of all ensures that you always have the right colour flower, being able to either use the same inks, card or papers that you are using on your scrapbook page. There are a lot of videos and tutorials on the internet for making many different flowers and I am sharing one today that I have found to work well and is relatively easy to make but looks quite stunning on a layout or card. I am hoping to share a few more tutorials over the next week.
There are a number of tutorials on the net showing how to make this type of "crimped" flower and I thank VICKY of Simply Paper for initially sharing this crimped technique. I wanted a flower that would be really sturdy to go on the cover of a mini-book and had mutliple layers and her technique just fitted this perfectly. I have made the flower with a number of different dies and stamps, so at the end of the tutorial I'll show how they came out quite differently.
To start you need some good quality smooth cream or white card - I use Stampin Up Very Vanilla. Die cut, punch or stamp a number of different sized leaves:
Edge each flower with some ink - you don't have to be too careful as the ink will soften when spritzed with water:
Spritz each flower with some water and then roll each petal over the barrel of a watercolour brush, then squeeze the petal to a point. I was trying to take a photograph with one hand and hold the paintbrush and flower with the other, but it is easier if you hold it horizontal!
Leave the flowers to dry and you will find that they go "crisp" and are quite sturdy.
Once the flowers are dry you might want to add a little more ink around the edges. Assemble the petals on top of each other, but ensuring the petals do not overlap the previous layer. As you glue each layer together hold each petal down with the end of the watercolour brush and you will see that the petal edges rise slightly and this gives depth to the flower rather than it being flat.
Experiment by making this type of flower with different dies, punches and stamps. This flower was made with petals cut from Donna Salazer's Rose Creations Die (Spellbinders) and using Ranger Co-ordinations Cardstock - it took alot of water to get the petals soft enough to manipulate, but again it dries crisp and holds it shape wonderfully.
This flower was made using the Artistic Stamper's Flower Power stamp and gives a slightly fuller petal which is lovely:
Oops a small one there made from the smallest flower on the Tim Holtz Tattered Florals die!
And here's another one using Ranger Craft Core Cardstock and Donna Salazar's Grand Peony Die for the outer petals and Tim Holtz Tattered Florals for the inner. Instead of inking the edges of the flower, once it was dry I rubbed it lightly with some sandpaper to reveal the core.
And here's another one using Ranger Craft Core Cardstock and Donna Salazar's Grand Peony Die for the outer petals and Tim Holtz Tattered Florals for the inner. Instead of inking the edges of the flower, once it was dry I rubbed it lightly with some sandpaper to reveal the core.
You don't have to stick to plain paperstock either - this was some brightly patterned text paper that I probably wouldn't have used in my scrapbooking but it made a great flower!
As I make more similar flowers using different dies, punches or stamps I will add them to this post!
Thanks for looking and I hope you have a go yourself!


Comments
xoxo Sioux
Sophie x
Thank you Jennie.
Juliaxx
xxx