From Box to Book
Hello and welcome to the first day of February!
Heaven only knows where January went, but the weeks seem to be passing by pretty quickly
As it is the first of the month it's time to share a new album for the Mini Album Makers Challenge. I just love making mini albums and know that so many of you do as well. We have no theme at Mini Album Makers, just share any mini album you have created this month.
Do hop on over and see the wonderful mini albums made by the rest of the Design Team HERE - so much wonderful inspiration!
My lovely friend and designer Eileen Hull has just released a number of new dies for Sissix which she showcased at Creativation 2020.

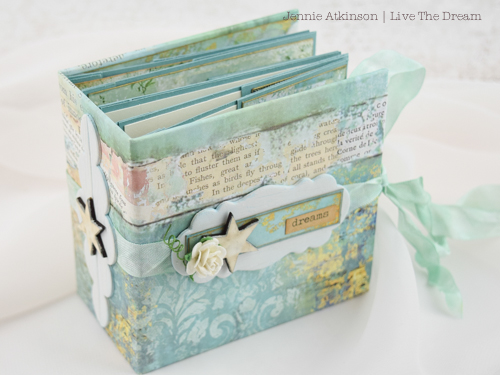
I was lucky to be able to create with some of the dies and whilst I love this wonderful gift box die, I thought it would make a rather nice chunky book! Thinking outside the box ....... !


I used one cut of the die, ie one side of the box, and all the lovely embellishments which Eileen always manages to fit onto the die.
These stunning Stamperia papers from their Wonderland Scapbooking Collection were just perfect and I used every last little piece to create little books, flaps and sleeves.


So here is how it came together:

From the single die cut of the box I cut off the side flaps and reduced the middle section to a piece measuring 2" wide. (X = the pieces I discarded)

I then adhered the three book parts (front cover, spine and back cover) onto the cover paper (5.1/4" x 11.1/2") and stuck down the edges with tape.
Now I am going to be absolutely honest here and say that the measurements I am giving you are hopefully correct ..... the book is now in America with Eileen and I am hoping that the little piece of paper which is stuck on my desk with loads of measurements is correct!

For the spine I cut five hinges measuring 3.5/8" x 1" and scored down the middle.

Then two side flaps measuring 3.5/8" x 2", scored 1/2" on one side.

These were then stuck directly onto the spine of the book and the side flaps stuck to the back and front cover.

There are many tutorials on Pinterest showing this type of hinged spine and my favourite is this one by Gloria Stengel which you can find HERE. She shows a brilliant step by step for the hinges and pages.

Once the hinges are in place it is then easy to insert the individual pages. The pages measure 3.5/8" x 3.5/8" and I have decorated them before sticking them into the book. I find this easier.

This is what it looks like when the first page has been glued in.

Then it is easy enough to decorate the reverse side covering up the spine edge flap in the process.

I just keep working through the book, making pages with little flaps, belly bands and plenty of cream cardstock for notes and/or photographs.

I like this type of hinged spine as the book lies quite flat with the pages flopping over each other.

Once all the pages are inserted cover the front and back inside covers.

I like to use EVERY scrap! and often make little books from the leftovers which can be either inserted under a flap or stuck down with some ribbon.


I then used them to decorate the inside front and back covers ......

....... and the spine ........

..... and the front cover capturing some ribbon under the plaque and the decorations on the spine.
Well a little photo heavy, but I hope you enjoy the tutorial and have a go at making a book yourself from a box! I really love the feel of such a chunky book and I am sure will be making another!
As always thank you for joining me and I hope you all have a lovely crafting weekend.
Jennie x
Comments
Alison x
TFS and hugs
Annie xx