Vintage Sewing Box
Hello and welcome to some more fun play. Today I am thinking outside the box, well lids really, as I have used the lids from Eileen' Hull's Treasure Box die to make this little vintage sewing box.
There were a lot of things I learnt along the way and things I would do differently when making another box.

I have crackled the mountboard and used napkins to create a lovely crackled decoupage effect.

I love the way the napkins, although layered over the crackle, seem to look as though they are under it. I also used a couple of paper clay embellishments - the clock wasn't very level and took a bit to glue on.
I wish I had seen Jenny Marple's tutorial over on the TFJB Challenge Blog on Saturday as she has a great tip for taking the clay out of the mould and glueing it in place before it dries. It is a great way to get the clay to lie flat!

I thought this little embellishment looked like a clasp so cut it in half and glued it to the front - a bit wonky! I have used gold wax over the paper clay just rubbing my finger over the raised parts.

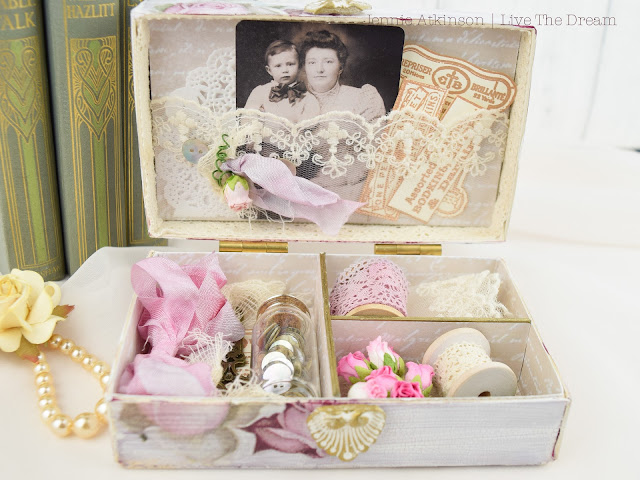
I also made a little book which sits inside the left hand compartment.

I am pretty hooked on stitching signatures and making little books at the moment!!!

I started with two lids from the Treasure Box die, made them up and painted the outside a deep red.

I then crackled them using DecoArt Crackle Paint - but was a bit disappointed in my brush marks! I only wanted a light crackle but actually should have used more crackle paste to avoid the marks.

Once the crackle had fully dried I layered some pretty napkins over the top and the front of the box using Gel Medium. Napkins have three layers and after cutting out what I wanted from the napkin I managed to separate the layers so I was just left with the very fine top layer. It is easier to put the Gel Medium onto the box and then layer the napkin over it. Trying to glue the napkin just results in it disintegrating!

To make the compartments I cut two pieces from the die (the shortest part of the lid box side) and on the second one I trimmed it slightly to fit. It's the sort of thing you can play around with in terms of how you want to divide your box.

Once I had the sizes right I covered both sides in paper to match the inside of the box and glued them in place. They need a bit of encouragement to stick! but persevere!

For the lid I made faux layer inside from the box sides, cutting them about 1/2" thick. I was finding that my layered inside lid was disappearing so felt it needed a little help to stand away from the box. This worked well.

I was then able to glue my inside layer to the raised edges. I had made the lace pocket before doing this. I also added lace around the edges of the lid before adding this layer and in hindsight wished I had waited until I had stuck everything down as I removed some of it trying to get it in. Also before adding the lace I wished I had run a gold pen around the edge of the box lids to tidy them up a bit.
It is all about doing things in the right order ...... for example the hinges need to go on before you line the box with either paper or lace if you want to hide the ends of the brads. My advice would be to have everything ready to make the box and then glue together rather than making a bit at a time as I was doing!

I am really pleased with the way this has turned out and will certainly be making another! It really is quite cute and I am sure my granddaughter would love something like this filled with lovely bits and pieces. Most of the ribbons and lace in this box were the result of my Tea Berry dyeing so there is a lovely smell of berries when you open the lid.
As always thank you for joining me and I hope this inspires you to have a go yourself.
Jennie x

There were a lot of things I learnt along the way and things I would do differently when making another box.

I have crackled the mountboard and used napkins to create a lovely crackled decoupage effect.

I love the way the napkins, although layered over the crackle, seem to look as though they are under it. I also used a couple of paper clay embellishments - the clock wasn't very level and took a bit to glue on.
I wish I had seen Jenny Marple's tutorial over on the TFJB Challenge Blog on Saturday as she has a great tip for taking the clay out of the mould and glueing it in place before it dries. It is a great way to get the clay to lie flat!

I thought this little embellishment looked like a clasp so cut it in half and glued it to the front - a bit wonky! I have used gold wax over the paper clay just rubbing my finger over the raised parts.

I also made a little book which sits inside the left hand compartment.

I am pretty hooked on stitching signatures and making little books at the moment!!!

I started with two lids from the Treasure Box die, made them up and painted the outside a deep red.

I then crackled them using DecoArt Crackle Paint - but was a bit disappointed in my brush marks! I only wanted a light crackle but actually should have used more crackle paste to avoid the marks.

Once the crackle had fully dried I layered some pretty napkins over the top and the front of the box using Gel Medium. Napkins have three layers and after cutting out what I wanted from the napkin I managed to separate the layers so I was just left with the very fine top layer. It is easier to put the Gel Medium onto the box and then layer the napkin over it. Trying to glue the napkin just results in it disintegrating!

To make the compartments I cut two pieces from the die (the shortest part of the lid box side) and on the second one I trimmed it slightly to fit. It's the sort of thing you can play around with in terms of how you want to divide your box.

Once I had the sizes right I covered both sides in paper to match the inside of the box and glued them in place. They need a bit of encouragement to stick! but persevere!

For the lid I made faux layer inside from the box sides, cutting them about 1/2" thick. I was finding that my layered inside lid was disappearing so felt it needed a little help to stand away from the box. This worked well.

I was then able to glue my inside layer to the raised edges. I had made the lace pocket before doing this. I also added lace around the edges of the lid before adding this layer and in hindsight wished I had waited until I had stuck everything down as I removed some of it trying to get it in. Also before adding the lace I wished I had run a gold pen around the edge of the box lids to tidy them up a bit.
It is all about doing things in the right order ...... for example the hinges need to go on before you line the box with either paper or lace if you want to hide the ends of the brads. My advice would be to have everything ready to make the box and then glue together rather than making a bit at a time as I was doing!

I am really pleased with the way this has turned out and will certainly be making another! It really is quite cute and I am sure my granddaughter would love something like this filled with lovely bits and pieces. Most of the ribbons and lace in this box were the result of my Tea Berry dyeing so there is a lovely smell of berries when you open the lid.
As always thank you for joining me and I hope this inspires you to have a go yourself.
Jennie x
Comments
ps. thank you so much for the shout out!
You really do have a wonderful eye for papers a beautiful choice with the lace. That hand bound mini book makes a wonderful addition.
I've so enjoyed spending an hour with you today. Thank YOU.
Creative Hugs Tracey xx
Alison x